Infrastructure as a code with Terraform, Ansible and AWS.
Learning Cloud Engineering with AltSchool Africa

I am a DevOps Engineer passionate about learning and writing about my experiences on my journey to be a world class Cloud/Devops Engineer. I am passionate about sharing knowledge, learning and mastering cloud technologies, making sweet treats, and putting smiles on the faces of people.
This project is designed for those who are familiar with the basic concepts of AWS, and have some experience building infrastructure via the AWS console and configuring servers with Ansible. As a newbie to Terraform, this project will be a great starting point for you to learn how to use this automation tool to deploy and manage your infrastructure.

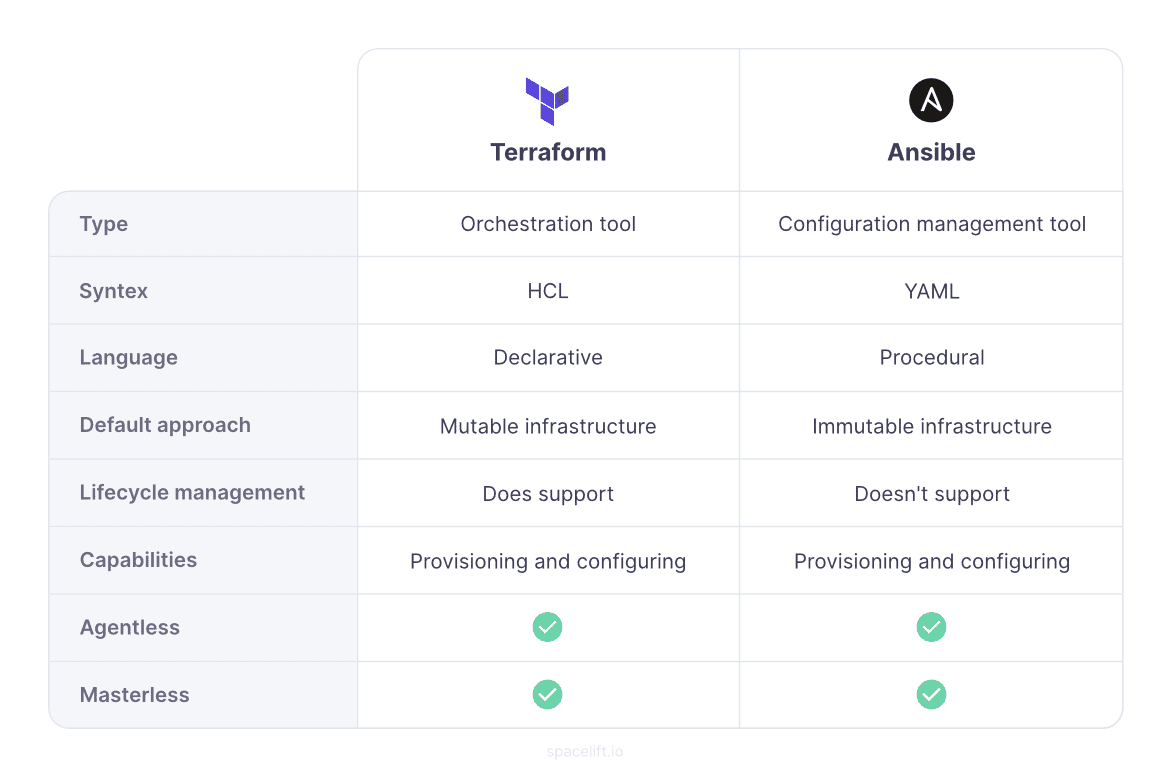
Terraform is an infrastructure as a code (IaC) software tool used for building, changing, and versioning infrastructure. It works with 500+ providers including AWS, GCP, AZURE, and Digital Ocean, whose resources can be used to provide the infrastructure. It is cloud agnostic and its configuration files are written in Hashicorp Configuration Language (HCL) which is simple to read. Terraform is declarative, meaning that you do not need to specify a step-by-step guide on how it should provision your infrastructure, it is a smart tool which handles that for you. All you need to do is state what you want and the features you need. We will see a practical example shortly

Ansible is a configuration management tool that comes in handy in configuring and deploying applications on the infrastructure. It is an agentless tool used to deploy configurations on the infrastructure. Ansible uses a simple, human-readable language, YAML (YAML Ain’t Markup Language), to define automation tasks called Playbook. Ansible can also be used to provide infrastructure as you saw me attempt in my last article, however, Terraform is the best tool to do that.
Below are some are the similarities and differences between the tools
Similarities
At a high level, given the capabilities of both, Terraform and Ansible come across as similar tools. Both of them are capable of provisioning a new cloud infrastructure and configuring the same with the required application components.
Both Terraform and Ansible are capable of executing remote commands on the virtual machine that is newly created. This means both tools are agentless. There is no need to deploy agents on the machines for operational purposes.
Terraform uses cloud provider APIs to create infrastructure and basic configuration tasks are achieved using SSH. The same goes for Ansible – it uses SSH to perform all the required configuration tasks. The “state” information for both does not require a separate set of infrastructure to manage, thus both tools are masterless.
Differences
At a high level, it sounds like both Terraform and Ansible are capable of provisioning and configuration management. However, a deeper dive into them makes us realize the benefits of one over the other in certain areas.
In general, both tools are great in their ways. They have an overlap of functions when it comes to infrastructure management. Infrastructure management broadly encompasses 2 aspects – orchestration and configuration management.
Terraform and Ansible have their ways of managing both – with strong and weak points when it comes to overlaps. Thus, it is important to delve into some details of both tools to make a “perfect” choice or a combination with boundaries.
Now that we have a good theoretical understanding of Terraform and Ansible, we will use both tools to build and configure infrastructure on AWS.
Project Task
Using Terraform, create 3 EC2 instances and put them behind an Elastic Load Balancer
Make sure that after applying your plan, Terraform exports the public IP addresses of the 3 instances to a file called host-inventory
Get a .com.ng or any other domain name for yourself (be creative, this will be a domain you can keep using) and set it up with AWS Route53 within your terraform plan, then add an A record for subdomain terraform-test that points to your ELB IP address.
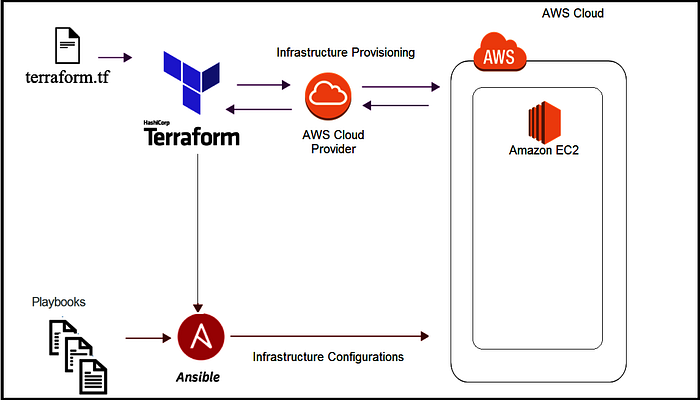
Create an Ansible script that uses the host-inventory file Terraform created to install Apache, set the timezone to Africa/Lagos and display a simple HTML page that displays content to identify all 3 EC2 instances.
Your project is complete when one visits terraform-test.yoursdmain.com and it shows the content from your instances while rotating between the servers as your refresh to display their unique content.
Submit both the Ansible and Terraform files created
How I solved this Task
Before we get started ensure that you have the following in place:
An AWS account
Terraform - This tutorial will use Terraform v1.0.8 already installed on Ubuntu 18.04.5 LTS machine.
A code editor - Make sure you have a code editor that can support HCL (Terraform language). Hint: Try out Visual Studio (VS) Code.
AWS Access Key and Secret Key as environment variables in your terminal. This is because when using Terraform to manage AWS resources, it needs your AWS access key and secret key to communicate with the AWS API. It is unsafe to hardcode this on the These keys are used to authenticate and authorise Terraform to access your AWS account. To keep sensitive information separate, it’s best to add your keys as environment variables instead of hardcoding them in Terraform configuration files or scripts. This way, you can safely store your Terraform code in a version control system without risking exposing sensitive information.
We will be creating the following files with contents, create the following files.
Providers.tf file
 terraform {
   required_providers {
     aws = {
       source  = "hashicorp/aws"
       version = "~> 4.0"
     }
 }
Vpc.tf
 resource "aws_vpc" "altschool-terraform" {
   cidr_block           = var.vpc-cidr
   enable_dns_support   = true #gives you an internal domain name
   enable_dns_hostnames = true #gives you an internal host name
   tags = {
     Name = "altschool-terraform"
   }
 }

 resource "aws_subnet" "public-subnet" {
   for_each                = var.public-subnets
   vpc_id                  = aws_vpc.altschool-terraform.id
   cidr_block              = each.value["cidr_block"]
   availability_zone       = each.value["azs"]
   map_public_ip_on_launch = true
   tags = {
     Name = "public-subnet-${each.key}"
   }
 }

 resource "aws_subnet" "private-subnet" {
   for_each          = var.private-subnets
   vpc_id            = aws_vpc.altschool-terraform.id
   cidr_block        = each.value["cidr_block"]
   availability_zone = each.value["azs"]
   tags = {
     Name = "private-subnet-${each.key}"
   }
 }
Network.tf. Here you'll create the network mapping of your vpc. Your subnets, route table Internet gateway
 resource "aws_internet_gateway" "terraform-igw" {
   vpc_id = aws_vpc.altschool-terraform.id

   tags = {
     Name = "terraforn-igw"
   }
 }
 resource "aws_route_table" "terraform-route-table" {
   vpc_id = aws_vpc.altschool-terraform.id

   route {
     cidr_block = "0.0.0.0/0" //subnet can reach anywhere
     gateway_id = aws_internet_gateway.terraform-igw.id
   }
   tags = {
     Name = "terraform-routetable"
   }
 }

 resource "aws_route_table_association" "public-route-table" {
   for_each = aws_subnet.public-subnet
   subnet_id      = each.value.id
   route_table_id = aws_route_table.terraform-route-table.id
 }
Ec2.tf : Here we used the data resource to use an ami to launch ubuntu instances for us. we are to create 3 instances here, so we will use a for each loop to create the instances in the public subnets we created earlier
 # data resource to get ami image for ubuntu intance
 data "aws_ami" "ubuntu" {
   most_recent = true
   owners =["amazon"]

   filter {
     name   = "name"
     values = ["ubuntu/images/hvm-ssd/ubuntu-focal-20.04-amd64-server-*"]
   }

   filter {
     name   = "virtualization-type"
     values = ["hvm"]
   }
 }

 data "aws_key_pair" "ansiblenew" {
   key_name           = "ansiblenew"
   include_public_key = true
 }

 output "fingerprint" {
   value = data.aws_key_pair.ansiblenew.fingerprint
 }

 output "name" {
   value = data.aws_key_pair.ansiblenew.key_name
 }

 output "id" {
   value = data.aws_key_pair.ansiblenew.id
 }

 resource "aws_instance" "web" {
   for_each = aws_subnet.public-subnet
   ami = data.aws_ami.ubuntu.id
   instance_type = var.instance_type
   key_name = var.key_name
   subnet_id = aws_subnet.public-subnet[each.key].id
   vpc_security_group_ids = [aws_security_group.instance-sg.id]
   associate_public_ip_address = true
     tags = {
       "Name" = "web-${each.key}"
     }
   provisioner "local-exec" {
     command = "echo '${self.public_ip}' >> ~/terraform/altschool/ansible/host-inventory"

  }
 }
Variables.tf for storing variables The variables.tf file contains variable blocks. Each variable block has the following: variable name in *quote" A “type” keyword that specifies the type of the variable. It could either be string, number, bool, list, map, tuple or object. A “description” keyword that describes what the variable represents. It is good practice to always add a description in the variable block. A “default” keyword which specifies a default value for the variable. If this is not provided the value of the variable is assigned from the terraform.tfvars file or can be passed when you run terraform plan or terraform apply.
 variable "region" {
     description = "region for hosting production"
     default = "us-east-1"
 }
 variable "vpc-cidr" {
   type = string
   default = "10.0.0.0/16"
 }
 variable "private-subnets" {
   description = "private subnets for vpc"
 type = map(object({
     cidr_block = string
     azs = string
   }))
 }

 variable "public-subnets" {
   description = "public subnets for vpc"
   type = map(object({
     cidr_block = string
     azs = string
   }))
 }

 variable "key_name" {
  description = "Enter the path to the SSH Public Key to add to AWS."
  default = "ansiblenew"
 }

 variable "instance_type" {
   default = "t2.micro"
 }

 variable "amis" {
  description = "Base AMI to launch the instances"
  default = {
     us-east-1 = "ami-00874d747dde814fa"
  }
 }

 variable "inbound-rules" {
   type = list(number)
   default = [80,443,22]
 }

 variable "elb-rules" {
   type = list(number)
   default = [80,443]

 }

 variable "domain_name" {
   type = string
   default = "ejirolaureld.live"
 }
terraform.tfvars
 public-subnets = {
   "pub-subnet-1" = {
     azs = "us-east-1a"
     cidr_block = "10.0.0.0/24"
   }
   "pub-subnet-2" = {
     azs = "us-east-1b"
     cidr_block = "10.0.1.0/24"
   }
   "pub-subnet-3" = {
    azs = "us-east-1c"
    cidr_block = "10.0.10.0/24"
   }
 }

 private-subnets = {
   "priv-subnet-1" = {
     azs = "us-east-1a"
     cidr_block = "10.0.16.0/20"
   }
   "priv-subnet-2" = {
     azs = "us-east-1b"
     cidr_block = "10.0.32.0/20"
   }
 }
elb.tf Here we'll create our load balancer where we will attach our instances to a target group
 resource "aws_security_group" "alb-sg" {
   name   = "terraformalb"
   vpc_id = aws_vpc.altschool-terraform.id
   egress {
     from_port   = 0
     to_port     = 0
     protocol    = "-1"
     cidr_blocks = ["0.0.0.0/0"]
   }
   dynamic "ingress" {
     for_each = local.elb-rules
     content {
       from_port   = ingress.value
       to_port     = ingress.value
       protocol    = "tcp"
       cidr_blocks = ["0.0.0.0/0"]
     }
   }
 }

 resource "aws_lb" "terraform-alb" {
   name               = "terraform-alb"
   internal           = false
   load_balancer_type = "application"
   security_groups    = [aws_security_group.alb-sg.id]
   subnets  = [for subnet in aws_subnet.public-subnetsub :
   subnet. id]
 }

 resource "aws_lb_target_group" "terraform-tg" {
   name     = "terraform"
   port     = 80
   protocol = "HTTP"
   vpc_id   = aws_vpc.altschool-terraform.id
   health_check {
     port = 80
     protocol = "HTTP"
     path = "/"
     matcher = "200-299"
   }
 }

 resource "aws_lb_listener" "terraform" {
   load_balancer_arn = aws_lb.terraform-alb.arn
   #count = length(var.vpc-public-subnets)
   port            = "443"
   protocol        = "HTTPS"
   ssl_policy      = "ELBSecurityPolicy-2016-08"
   certificate_arn = "arn:aws:acm:us-east-1:605653682163:certificate/0323079b-bd22-418c-8c0c-a733846602d2"

   default_action {
     type             = "forward"
     target_group_arn = aws_lb_target_group.terraform-tg.arn

   }
 }
 resource "aws_lb_listener" "http-https" {
   load_balancer_arn = aws_lb.terraform-alb.arn
   port              = "443"
   protocol          = "HTTPS"

   default_action {
     type = "redirect"

     redirect {
       port        = "80"
       protocol    = "HTTP"
       status_code = "HTTP_301"
     }
   }
 }
 resource "aws_lb_target_group_attachment" "terraform-tg" {
   for_each = aws_instance.web
   target_group_arn = aws_lb_target_group.terraform-tg.arn
   target_id = each.value.id
   port = 80
 }
route 53 . I already have a hosted zone so I used data resources to target it. Then I created a new A record set for the domain
 data "aws_route53_zone" "hosted-zone" {
   name         = "ejirolaureld.live"
   private_zone = false
 }

 resource "aws_route53_record" "www" {
   zone_id = data.aws_route53_zone.hosted-zone.zone_id
   name    = "terraform-test.${data.aws_route53_zone.hosted-zone.name}"
   type    = "A"
   #ttl     = "300"
   #records = ["4"]
   #resource_record_set_count = 4
   alias {
     name = aws_instance.web.dns_name
     zone_id = aws_instance.web.zone_id
     evaluate_target_health = true
   }
 }
locals.tf
 locals {
   inbound_rules = var.inbound-rules
   elb-rules     = var.elb-rules

 }
After creating the above files run
terraform initterraform planterraform applyto create your infrastructure.Make sure to create an ansible directory for your host inventory file in your terraform folder. This is the file path for mine
terraform/altschool/ansible/host-inventoryand create your ansible config.
The source code for this project can be gotten from https://github.com/EjiroLaurelD/terraform-project
Run
terraform destroyonce you are done, cleaning up all the provisioned infrastructure
Resource
Thank you to Mariusz Michalowski, Community Manager @Spacelift for contacting me with this enlightening resource on the Terraform vs. Ansible: Key Differences and Comparison of Tools to share with you. Kindly check it out for a detailed explanation of the two products
Thank you for Reading

